Friday, 7 December 2018

New automated machine learning capabilities in Azure Machine Learning service

We are excited to announce the new automated machine learning (automated ML) capabilities. Automated ML allows you to automate model selection and hyperparameter tuning, reducing the time it takes to build machine learning models from weeks or months to days, freeing up more time for them to focus on business problems. The making of automated ML was driven by our commitment to improve the productivity of data scientists and democratize AI. By simplifying machine learning, automated ML enables domain experts in the businesses to rapidly build and deploy machine learning solutions.

In this blog post, we will:

1. Highlight the new automated ML capabilities of that are available today as part of Azure Machine Learning service
2. Walk you through the motivation, underlying technology, and principles behind automated ML


New capabilities


Since the preview of Azure Machine Learning service just a couple of months ago, we have added many compelling capabilities.

Training infrastructure

Machine learning training jobs are very compute intensive, and training time is highly dependent on the size of the dataset and the type of algorithm. As a result, training is often a bottleneck and the ability to complete jobs quickly enables data scientists to iterate fast. With automated ML, you have many choices for compute infrastructure that you can run your training jobs with. Start by running your jobs on your local machine and scale up and out using the Azure cloud.

Azure Machine Learning compute

When you are ready to scale, automated ML enables you to run your training jobs in the Azure Cloud by scaling up as well as running multiple training jobs in parallel using Azure Machine Learning compute or Azure Databricks clusters. With Azure Machine Learning compute, you can setup a cluster of Azure Virtual Machines to run your training jobs in parallel. Autoscaling ensures that virtual machines are shut down when the training jobs are complete, saving you costs.

Azure Databricks (preview)

Azure Databricks is a managed Spark offering on Azure that is popular with big data processing. With automated machine learning on Azure Databricks, customers who use Azure Databricks can now use the same cluster to run automated machine learning experiments, allowing data to remain in the same place. You can leverage the local worker nodes with autoscale and auto termination capabilities.

Local computer

Often data scientists start training machine learning models on their local computer with down sampled data. Constraints such as the data governance and security policies of organizations may require data to stay on-premises. With automated ML, you can run your training jobs entirely on your local machine without data ever leaving your computer, complying with data security and protection needs.

Data pre-processing and featurization

Data Scientists spend a large percentage of their time on data cleaning, transformation, and generating new features. Automated ML simplifies many of these data pre-processing tasks by automatically transforming categorical features into one hot encoding, imputing missing values and rows, generating new date time features, and more.

Visual charts

Automated ML comes with rich visual charts such as a leaderboard of all the candidate models built by automated ML. Also included are many different metrics of each model and charts to help visualize/compare model performance such as confusion matrices. Visual charts are integrated into Jupyter notebooks via an extension so that you never have to leave the comfortable notebook experience. The charts are also available on Azure Portal for those who use a different IDE.

Forecasting (preview)

In addition to classification and regression, we now support forecasting. Time series forecasting is a common problem and has applications in many industries. For example, retail companies want to forecast future product sales and energy utilities want to forecast power consumption demand. It is critical to ensure model tuning takes into consideration windows of time and aggregation to tune a model for optimal performance. When using the forecasting capability, automated machine learning optimizes our pre-processing, algorithm selection and hyperparameter tuning to recognize the nuances of time series datasets. Our service expands our support for feature engineering with greater focus on things like grain index featurization and grouping and missing row imputation to provide greater model performance and accuracy.

Model Explain Ability (preview)

Most businesses run on trust and being able to open the ML “black box” helps build transparency and trust.  In heavily regulated industries like healthcare and banking, it is critical to comply with regulations and best practices.  One key aspect of this is understanding the relationship between input variables (features) and model output.  Knowing both the magnitude and direction of the impact each feature (feature importance) has on the predicted value helps better understand and explain the model. With model explain ability, we enable you to understand feature importance as part of automated ML runs.

Region availability

Azure Machine Learning service is available in many regions in U.S (east and west coast), Europe, Asia and Australia. Having automated ML available in a region near you will help reduce the network latency. If your data is subject to data sovereignty and governance rules, you can choose to use automated ML that is available in your geography to adhere to these requirements.

Why automated machine learning?


Machine learning is complex

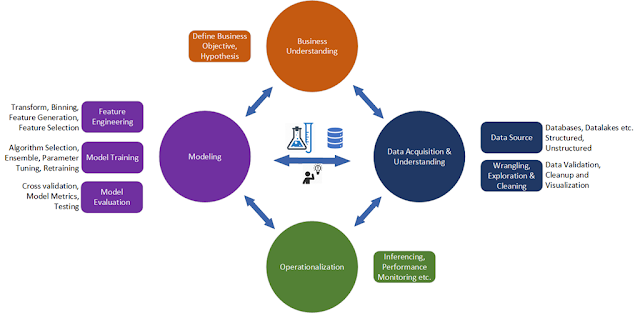
Developing machine learning solutions is complex, tedious and time consuming. The typical machine learning lifecycle consists of four parts: business understanding, data acquisition, modeling, and operationalization. Every Machine Learning solution should start with the business problem you are working to solve followed by acquiring and exploring the data that is needed.
Azure Certification, Azure Guides, Azure Tutorial and Material, Azure Machine Learning Service

In the feature engineering part of the modeling stage, you need to transform the input data via techniques such as removing nulls, rescaling, selecting for features, and/or generating new features. Next, you choose which machine learning algorithm is most suitable - a support vector machine (SVM), logistic regression, or a tree-based classifier? What parameter values should be used for the chosen algorithm (ex. the max depth and min split count for a tree-based classifier)? And many more. Just look at this “simple” tutorial chart from the scikit-learn machine learning library to see the complexity of algorithm selection:

Azure Certification, Azure Guides, Azure Tutorial and Material, Azure Machine Learning Service

In short, data scientists and developers face a series of sequential and interconnected decisions along the way to achieving "magical" machine learning solutions. Ultimately, all these decisions will determine the accuracy of the machine learning pipeline – it comes down to the combination of data pre-processing / feature engineering steps, learning algorithms, and hyperparameter settings that go into each machine learning solution.

Due to this variability, data scientists typically build several models with different combinations of features, learners and hyper parameters. These models are then evaluated to optimal accuracy and the most suitable is selected. Building multiple models and evaluating them is tedious and often takes many weeks. When machine learning solutions need to be updated as data evolves, data scientists would need to repeat the same feature engineering, model training and evaluation process.

Simplifying machine learning

But what if a developer or data scientist could access an automated service that identifies the best machine learning pipelines for their labelled data? The Automated ML capability in the Azure Machine Learning service provides this solution. Automated ML empowers users, with or without data science expertise, to identify an end-to-end machine learning pipeline for any problem, achieving a high quality machine learning model while spending far less of their time. It enables a significantly larger number of experiments to be run, resulting in faster iteration towards production-ready solutions.

Azure Certification, Azure Guides, Azure Tutorial and Material, Azure Machine Learning Service

Microsoft is committed to democratizing AI through our products. By simplifying and removing the need to tune models, hyperparameters manually, we are boosting the productivity of the users. By making automated ML available through the Azure Machine Learning service, we're empowering data scientists and organizations to build, deploy and manage the machine learning life cycle from end to end.

If you are new to data science, automated ML will help you get started quickly. Simplify the machine learning model building process by abstracting away the complexity of feature engineering, algorithm selection and hyperparameter tuning. This will enable more people in your organization to leverage machine learning and most importantly allow domain experts to rapidly prototype ML solutions and validate their hypothesis before involving data scientists.

If you are an experienced data scientist, automated ML will let you improve productivity and save time by eliminating the need to manually perform the tedious and repetitive tasks of feature engineering, algorithm selection and hyperparameter tuning. You can even start by generating a model with automated ML as a starting point and tune it further. Organizations can also use automated ML to benchmark their models.

Many Fortune 500 customers are benefiting from using automated ML. These include a global oil & refinery enterprise that’s using automated ML to forecast reservoir production and a medical devices company that’s using automated ML for predictive maintenance. Automated ML also powers Microsoft Power BI’s AI capabilities, where business analysts can build machine learning models without writing a single line of code.

What’s behind automated machine learning?


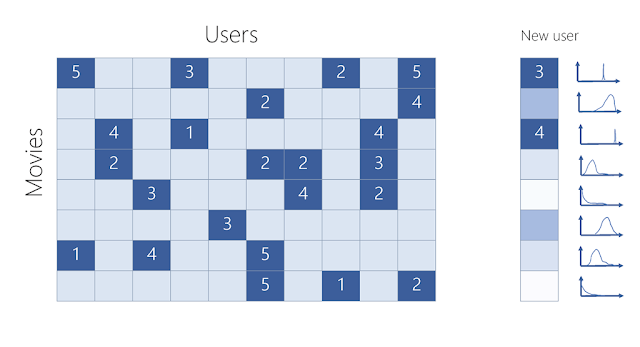
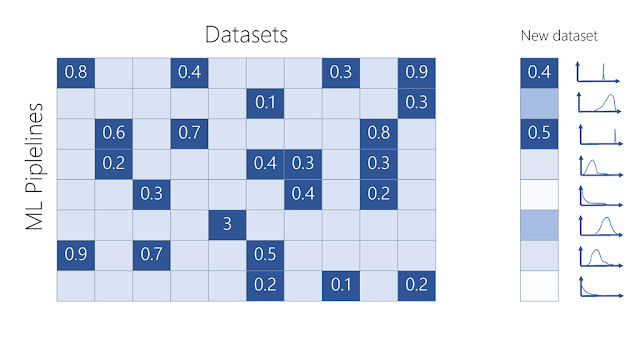
Azure Machine Learning service’s automated ML capability is based on a breakthrough from our Microsoft Research division and different from competing solutions in the market. The approach combines ideas from collaborative filtering and Bayesian optimization to search an enormous space of possible machine learning pipelines intelligently and efficiently. It's essentially a recommender system for machine learning pipelines. Similar to how streaming services recommend movies for users, automated ML recommends machine learning pipelines for data sets.

Azure Certification, Azure Guides, Azure Tutorial and Material, Azure Machine Learning Service

Streaming service (numbers represent user ratings for movies)

Azure Tutorial and Material, Azure Certification, Azure Learning, Azure Study Material

Automated ML (numbers represent accuracy of pipelines evaluated on datasets)

As indicated by the distributions shown on the right side of the figures above, automated ML also takes uncertainty into account, incorporating a probabilistic model to determine the best pipeline to try next. This approach allows automated ML to explore the most promising possibilities without exhaustive search, and to converge on the best pipelines for the user’s data faster than competing “brute force” approaches.
We trained automated ML’s probabilistic model by running hundreds of millions of experiments, each involving evaluation of a pipeline on a data set. This training allows automated ML to find good solutions quickly for your new problems. Automated ML continues to learn and improve today as it runs on new ML problems – even though it does not see your data. More about that next.

Design principles


At Microsoft our mission is to democratize machine learning by simplifying model building and improving the productivity of data scientists. We also place a strong emphasis on trust and data privacy. The principles behind automated ML seek to further the mission.

Data privacy

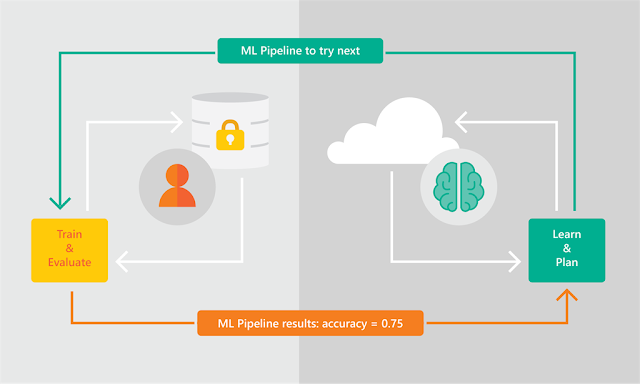
Automated ML is designed to generate pipelines without having to see the customer’s data, preserving privacy. Customer data and execution of the machine learning pipeline both live in the customer’s cloud subscription (or their local machine), which they have complete control of. Only the results of each pipeline run are sent back to the automated ML service, which then makes an intelligent, probabilistic choice of which pipelines should be tried next.

No need to “see” the data

Azure Certification, Azure Guides, Azure Tutorial and Material, Azure Machine Learning Service

Get started easily— Python SDK


Python is one of the most popular languages for building machine learning solutions due to the availability of numerous libraries such as numpy, matplotlib and machine learning frameworks such as scikit-learn, PyTorch, and TensorFlow. Users leverage all of these tools by downloading and installing libraries. Azure Machine Learning service uses the same paradigm— download and install the Azure Machine Learning service Python SDK which includes the automated ML capability. As a result, an intuitive and simple to use API is all it takes to run automated ML training jobs.

Bring to the IDEs that you are already familiar with


There are several Python development environments available for data scientists use. Those from a development background may prefer an IDE like PyCharm or VS Code. Data scientists who work with other team members may be using Jupyter Notebooks. Our goal is to bring automated ML to the development environments you use and are familiar with. Part of the Azure Machine Learning service Python SDK, automated ML works in any Python environment. All you need to do is download and install the SDK like any other Python libraries that you use. Automated ML has extensions for Jupyter Notebooks, which will help you visualize automated ML runs, monitor jobs, inspect stats without leaving the notebook environment.

Open source frameworks – sci-kit-learn, LightGBM


Machine Learning is innovating at very rapid pace thanks to an active open source community and rich set of open source frameworks. Many solutions today were simply unimaginable a few years ago. At Microsoft, our goal is to support popular frameworks and not get your organization locked into a proprietary framework. This helps organizations to innovate quickly without being stifled by proprietary frameworks.

Control and transparency


When building machine learning solutions, data scientists must inspect many attributes of machine learning models to and carefully weigh the trade-offs of each before choosing an optimal for a given business problem. Speed and automation versus accuracy, simple and interpretable versus complex and accurate, the list goes on. We want to provide complete control and transparency into all the models that automated ML generates so you can choose the best one for your scenario by making the tradeoffs that make sense for your business problem. The models and pipelines automated ML generates are regular Python pipelines that you are free to deconstruct and further tune.

Explore


We created automated ML to make machine learning more accessible for data scientists of all levels of experience.

Tuesday, 4 December 2018

Modernize your Java Spring Boot application with Azure Database for MySQL

Spring is a well-known Java-based framework for building web and enterprise applications addressing the modern business needs. One of the advantages of using the Spring Boot framework is that it simplifies the data access from relational and NoSQL data stores. Spring Boot framework with MySQL Database backend is one of the established patterns to meet the online transactional processing needs of business applications. The modern business applications are built and deployed on cloud native microservice platforms like Azure Kubernetes service (AKS) moving away from traditional monolithic design to meet the elastic scale and portability needs. The databases on the other hand have more stateful requirements with atomicity, consistency, durability, resiliency, and zero data loss across failures. It is therefore more suited to run databases outside of Kubernetes environment on managed database services like Azure Database for MySQL service which meets these requirements.

Developers and customers can easily build and deploy their Java Spring Boot microservices application in Azure platform thereby improving developer productivity and enabling businesses to achieve more with the following solutions.

◈ Azure DevOps, a developer platform to build automated and robust CI/CD pipelines.
◈ Azure Kubernetes Service, a managed Kubernetes platform.
◈ Azure Container Instance, a serverless container platform for running containerized solutions on Azure.
◈ Azure Database for MySQL, a fully managed, enterprise ready community MySQL database as a service, .

The following is a functional architecture sample of a Java Spring Boot microservices application called po-service on Azure. This Spring Boot application demonstrates how to build and deploy a purchase order microservice as a containerized application on Azure Kubernetes Service (AKS). The deployed microservice supports all CRUD operations on purchase orders.

Azure Study Materials, Azure Guides, Azure Certification, Azure Tutorial and Materials

To enable and integrate the microservices application running on Azure Kubernetes services with the database running on Azure Database for MySQL service, developers can utilize and leverage Open Service Broker for Azure together with Kubernetes Service Catalog.

We have published detailed step-by-step instructions to build and deploy the above architecture in our GitHub repository. The overall goal of this step-by-step guide is:

◈ To demonstrate the use of Open Service Broker for Azure to provision, deploy, and integrate Azure Database for MySQL from Azure Kubernetes Service seamlessly using the DevOps pipeline.
◈ To demonstrate the use of Helm (CLI) for deploying containerized applications on Kubernetes (AKS). Helm is a package manager for Kubernetes and is a part of CNCF. Helm is used for managing Kubernetes packages called Charts.
◈ To demonstrate how to secure a microservice (REST API) end-point using SSL/TLS (HTTPS transport) and expose it through the Ingress Controller addon on AKS.
◈ To demonstrate the serverless container solution by deploying the microservice on Azure Container Instances (ACI).

Sunday, 2 December 2018

Time series analysis in Azure Data Explorer

Azure Data Explorer (ADX) is a lightning fast service optimized for data exploration. It supplies users with instant visibility into very large raw datasets in near real-time to analyze performance, identify trends and anomalies, and diagnose problems.

Azure Data Explorer, Azure Certification, Azure Tutorial and Material, Azure Guides, Azure Learning

ADX performs an on-going collection of telemetry data from cloud services or IoT devices. This data can then be analyzed for various insights such as monitoring service health, physical production processes, and usage trends. The analysis can be performed on sets of time series for selected metrics to find a deviation in the pattern of the metrics relative to their typical baseline patterns.

ADX contains native support for creation, manipulation, and analysis of time series. It empowers us to create and analyze thousands of time series in seconds and enable near real-time monitoring solutions and workflows. In this blog post, we are going to describe the basics of time series analysis in Azure Data Explorer.

Time series capabilities


The first step for time series analysis is to partition and transform the original telemetry table to a set of time series using the make-series operator. Using various functions, ADX then offers the following capabilities for time series analysis:

◈ Filtering – Used for noise reduction, smoothing, change detection, and pattern matching.
◈ Regression analysis – Used for trend change detection in streamed data.
◈ Seasonality detection – Used to automatically detect or validate seasonal or periodic patterns in each time series.
◈ Element-wise functions – Used to perform arithmetic and logical operations between two time series.

Example of a time series analysis query


The following query uses series_periods_detect and series_fit_line for time series analysis and discovery of periodic patterns and decreasing trends:

let min_t = toscalar(demo_many_series1 | summarize min(TIMESTAMP));
let max_t = toscalar(demo_many_series1 | summarize max(TIMESTAMP));
demo_many_series1
| make-series reads=avg(DataRead) on TIMESTAMP in range(min_t, max_t, 1h) by Loc, Op, DB
| where series_partial_sf(reads, 0) == false
| extend (p, ps)=series_periods_detect(reads, 0, 24, 1)
| mvexpand p to typeof(double), ps to typeof(double)
| where ps > 0.7
| extend series_fit_line(reads)
| top 2 by series_fit_line_reads_slope asc
| render timechart with(title='Top 2 Periodic Decreasing Web Service Traffic (out of 18,339 instances)')

In this query, Azure Data Explorer analyzes 18,339 time series of web service traffic and extracts those with a periodic pattern. Out of this subset, ADX looks for those instances with a decreasing trend. This entire processing takes only about one minute.

Azure Data Explorer, Azure Certification, Azure Tutorial and Material, Azure Guides, Azure Learning

Thursday, 29 November 2018

Simplifying security for serverless and web apps with Azure Functions and App Service

Serverless and PaaS are all about unleashing developer productivity by reducing the management burden and allowing you to focus on what matters most, your application logic. That can’t come at the cost of security, though, and it needs to be easy to achieve best practices. Fortunately, we have a whole host of capabilities in the App Service and Azure Functions platform that dramatically reduce the burden of securing your apps.

Today, we’re announcing new security features which reduce the amount of code you need in order to work with identities and secrets under management. These include:

◈ Key Vault references for Application Settings (public preview)
◈ User-assigned managed identities (public preview)
◈ Managed identities for App Service on Linux/Web App for Containers (public preview)
◈ ClaimsPrincipal binding data for Azure Functions
◈ Support for Access-Control-Allow-Credentials in CORS config

We’re also continuing to invest in Azure Security Center as a primary hub for security across your Azure resources, as it offers a fantastic way to catch and resolve configuration vulnerabilities, limit your exposure to threats, or detect attacks so you can respond to them. For example, you may think you've restricted all your apps to HTTPS-only, but Security Center will help you make absolutely sure. If you haven’t already, be sure to give it a try.

So, without any further ado, let’s talk about the details of these new features!

Key Vault references for Application Settings (public preview)


At Microsoft Ignite 2018, we gave a sneak peek of a new feature that would allow apps to source their application settings from Key Vault. I’m incredibly pleased to announce that as of today, this feature is available in public preview!

More and more organizations are moving to secure secrets management policies, which is fantastic to see. Azure Key Vault gives you one source of truth for your secrets, with full control over access policies and audit history. While the existing Application Settings feature of App Service and Azure Functions is considered secure, with secrets encrypted at rest, it doesn’t provide these management capabilities that you may need.

However, working with Key Vault traditionally requires you to write some new code. We’ve found that many teams can’t easily update every place their application works with secrets, particularly in legacy applications. Azure Functions triggers are also an issue, as they are managed by the platform. Both of these scenarios are addressed with this new feature.

Sourcing Application Settings from Key Vault


The Key Vault references feature makes it so that your app can work as if it were using App Settings as they have been, meaning no code changes are required. You can get all of the details from our Key Vault reference documentation, but I’ll outline the basics here.

This feature requires a system-assigned managed identity for your app. Later in this post I’ll be talking about user-assigned identities, but we’re keeping these previews separate for now.

You’ll then need to configure an access policy on your Key Vault which gives your application the GET permission for secrets.

Lastly, set the value of any application setting to a reference of the following format:

@Microsoft.KeyVault(SecretUri=secret_uri_with_version)

Where secret_uri_with_version is the full URI for a secret in Key Vault. For example, this would be something like: https://myvault.vault.azure.net/secrets/mysecret/ec96f02080254f109c51a1f14cdb1931

Azure Tutorial and Material, Azure Guides, Azure Certification, Azure Learning

That’s it! No changes to your code required!

For this initial preview, you need to explicitly set a secret version, as we don’t yet have built-in rotation handling. This is something we look forward to making available as soon as we can.

User-assigned managed identities (public preview)


Our existing support for managed identities is called system-assigned. The idea is that the identity is created by the platform for a specific application and is tied to the lifecycle of the application. If you delete the application, the identity is removed from Azure Active Directory immediately.

Today we’re previewing user-assigned identities, which are created as their own Azure resource and then assigned to a given application. A user-assigned identity can also be assigned to multiple applications, and an application can have multiple user-assigned identities.

Azure Tutorial and Material, Azure Guides, Azure Certification, Azure Learning

Quick tip: Although you can use an identity for multiple resources, be careful not to over-share identities and leak permissions to resources that don’t need them. Always keep the principle of least privilege in mind, and default to creating separate identities for each component of your application. Only share if truly necessary.

Managed identities for App Service on Linux/Web App for Containers (public preview)


We’re also pleased to expand our support for managed identities to App Service on Linux/Web App for Containers. Now, Linux apps can have the same great experience of turnkey service-to-service authentication without having to manage any credentials. This preview includes both system-assigned and user-assigned support. In addition to a token service that makes it easy to request access to resources like Key Vault and Azure Resource Manager, this new support also gives Linux apps access to the Key Vault references feature mentioned before.

To get started with your Linux applications.

Azure Tutorial and Material, Azure Guides, Azure Certification, Azure Learning

ClaimsPrincipal binding data for Azure Functions


Since the first preview of Azure Functions, you’ve been able to use App Service Authentication/Authorization to limit access to your function apps. Today we’re making it easier to leverage incoming identities from your function code. This is currently finishing deployment it will be available to all function apps in Azure by the end of the week.

For .NET, this is exposed as a ClaimsPrincipal object, similar to what you’d see in ASP.NET. The object will be automatically injected if you add a ClaimsPrincipal object to your function signature, similar to how ILogger is injected.

using System.Net;
using Microsoft.AspNetCore.Mvc;
using System.Security.Claims;

public static IActionResult Run(HttpRequest req, ClaimsPrincipal principal, ILogger log)
{
     // ...
     return new OkResult();
}

Other languages will be able to access the same through the context object in an upcoming update. Until then, this is a .NET-only preview. 

I really love how this cleans up identity-dependent functions. This feature, in combination with the token binding, removes a nice bit of code that isn’t core to your business logic.

Support for Access-Control-Allow-Credentials in CORS config


Last, but not least, we have a quick update to our CORS feature which enables the Access-Control-Allow-Credentials header to be set. This is necessary whenever you need to send cookies or a token as part of calling your API. Without this response header being set, the browser will not pass data along.

You can find out more about the CORS feature and this new setting in the tutorial, “Host a RESTful API with CORS in Azure App Service.” To enable the header, you’ll just need to update your CORS config to set “supportCredentials” to true.

The Access-Control-Allow-Credentials header can also be enabled in the local Functions host for development purposes.

Wednesday, 28 November 2018

Azure Cosmos DB and multi-tenant systems

We will discuss how to build a multi-tenant system on Azure Cosmos DB. Azure Cosmos DB itself is a multi-tenant PaaS offering on Microsoft Azure. Building a multi-tenant system on another multi-tenant system can be challenging, but Azure provides us all the tools to make our task easy. An example of a multi-tenant system would be a company providing background check services that any other company can use in their HR system. For the purposes of this blog post we are going to use this example and continue from the point of view of company providing background checks as a service. We will refer to this company as “publisher.”

Let’s begin to discuss how you can build a multi-tenant system that will store sensitive user data. Data isolation and security is the most important aspect of any system. We must design the system so that each tenant’s data is isolated from one another. The data stored in any given tenant should be divided into compartments so one tenant breach cannot flow into another tenant. This would be similar to compartmentalizing the hull of a ship to reduce floodability.

To increase the isolation and protection of customer data in a multi-tenant system, we should build the system with only one approved service that can have just in time (JIT) access to tenant data. We need to set up a different system principal for each customer’s data partition so that the scope of access for any principal is segmented by customer. We don’t want a service to have access to all tenant data, that is a big security risk. What we want is the service to get the access permission for one tenant JIT. The benefit of this approach is tenants can rotate their certificates and keys anytime.

Every tenant can manage their data using the publisher's front-end service (FES), but they cannot directly manipulate their own data in Azure Cosmos DB collections. This isolation will remove the need for every tenant to have access to master and read-only keys. All the data access will happen through a service and no one will access Azure Cosmos DB unless directly on the portal or through code. The publisher application, which manages the customer data, is hosted in a different Azure Active Directory tenant and subscription, which is separate from that of the customer’s tenant and data.

However, the tenant will own all the collections and data without having direct access to the data. This simplifies the billing for all data storage and throughput that the tenant is directly billed, but is a tricky requirement. Let’s see how you can manage this requirement.

The main actors of this solution are Azure Managed Applications, Daemon Application, Azure Cosmos DB, Azure Key Vault and Azure Active Directory (AAD). The following paragraphs will help us understand each of the mentioned solutions.

An Azure Managed Application is like a service catalog in the marketplace, but with one key difference. In a managed application, the resources are provisioned in a resource group that is managed by the publisher of the app. The resource group is present in the consumer's subscription, but an identity in the publisher's tenant has access to the resource group in the customer subscription. As the publisher, you specify the cost of ongoing support for the solution.

Azure Cosmos DB, Azure Certification, Azure Tutorial and Material, Azure Learning, Azure Database

Managed applications reduce barriers to consumers using your solutions. They do not need expertise in cloud infrastructure to use your solution. Consumers have limited access to the critical resources. They don't need to worry about making a mistake when managing it. Managed applications enable customers to adopt your solution without needing expertise in the underlying Azure infrastructure.

Managed applications enable you to establish an ongoing relationship with your consumers. You define the terms for managing the application, and all charges are handled through Azure billing.

Although customers deploy these managed applications in their subscriptions, they do not have to maintain, update, or service them. You can ensure that all customers are using approved versions. Customers do not have to develop application specific domain knowledge to manage these applications. They automatically acquire application updates without the need to worry about troubleshooting and diagnosing issues with the applications. The advantages of an Azure Managed Application is billing, separation of data between different tenants, easy maintenance, among other benefits.

After deploying a tenant managed application, create a daemon application. Follow the instructions on how to create an AAD application and service principal that can access resources. This daemon application has its own identity and access to tenant subscription. This application is the bridge between the customer tenant application and the service provider (publisher).

It is important to understand a few things. First, user interaction is not possible with a daemon application, which requires the application to have its own identity. An example of a daemon application is a batch job, or an operating system service running in the background. This type of application requests an access token by using its application identity and presenting its application ID, credentials (password or certificate), and application ID URI to AAD. After a successful authentication, the daemon receives an access token which represents the identity of the application from AAD and is then used to call the web API.

The magic of Azure Managed Applications is that the publisher can access the customer subscription resources it managed as if these resources are located within a subscription in the publisher’s AAD tenant. The customer tenant subscription resources are visible to the customer in their own Azure subscription, but are not accessible due to an Azure Resource Lock. Only the publisher has full access to the managed application resources in the customer’s subscription.

After creating the daemon application, you need to register it in the identity and access (IAM) of Azure Cosmos DB instance, which is deployed as a managed resource component of the customer tenant subscription.

The last piece you will develop is the front-end service (FES). This the service used to manage the components in the customer tenant. This service cannot directly access Azure Cosmos DB until it goes through the orchestration of taking the daemon application identity. The following illustrates a step-by-step walkthrough for the FES interaction with the customer’s subscription resources.

Azure Cosmos DB, Azure Certification, Azure Tutorial and Material, Azure Learning, Azure Database

FES takes over the daemon application identity at the run time. FES also has its own managed identity (MSI) which is registered in Key Vault for access. At the run time, the FES connects to the Key Vault using the Azure MSI and obtains the certificate credential, which in turn uses a credential to obtain a token from AAD representing the daemon application (Step 1).

Once the FES gets the certificates, it assumes the identity of daemon service by using the client ID and secret certificate. Then it will call AAD to get the access token for the Managed Application (Step 2). This FES uses Azure Active Directory Authorization DLL (AAD DLL). See the FES code snippet below, which helps FES to get the token from AAD.

using Microsoft.Azure.KeyVault;
using Microsoft.Azure.Services.AppAuthentication;
using Microsoft.IdentityModel.Clients.ActiveDirectory;

string secretIdentifier = " key vault secretIdentifier for daemon app goes here ";
var tokenCache = TokenCache.DefaultShared;
string pubTenantId = " publisher’s Azure AD directory id here ";

//// get app key from Key Vault (… let me know if you need a sample for reading a certificate/private key instead of a secret
var azureServiceTokenProvider = new AzureServiceTokenProvider();

var keyVaultClient = new KeyVaultClient(new KeyVaultClient.AuthenticationCallback(azureServiceTokenProvider.KeyVaultTokenCallback));
string secret = keyVaultClient.GetSecretAsync(appKey)
.GetAwaiter()
.GetResult();

//// now get a token representing the Daemon app, using the secret credential of the Daemon Azure AD application.  Resource is the appropriate Azure resource Uri.
string daemonAppId = "daemon Azure AD application Id";
string authString = $"https://login.microsoftonline.com/{pubTenantId}";
string daemonAppResourceUri = "https://management.core.windows.net/";
var clientCredential = new ClientCredential(daemonAppId, secret.Value);
var authenticationContext = new AuthenticationContext(authString, false, tokenCache);

var authnResult = authenticationContext.AcquireTokenAsync(resourceUri, clientCredential)
.GetAwaiter()
.GetResult();

string daemonToken = authnResult.AccessToken;

//// alternately, to use a certificate you would substitute the above variables:
////     var clientCredential = new ClientAssertionCertificate(clientId, certificate);

Once the access token is obtained by FES, it calls into Azure Cosmos DB to get the master key (Step 3 and 4). This is accomplished by using the access token of the daemon application. For this FES we pass the AAD token in header.

using Microsoft.Azure.Management.CosmosDB.Fluent;
using Microsoft.Azure.Management.Fluent;
using Microsoft.Azure.Management.ResourceManager.Fluent;
using Microsoft.Azure.Management.ResourceManager.Fluent.Core;

string subscriptionId = " subscribing customer’s subscription id ";
string resourceGroupName = " subscribing customer’s resource group name ";
string databaseAccountName = " subscribing customer’s Cosmos DB account name ";

var credential = new AzureCredentials(new TokenCredentials(daemonToken), pubTenantId, AzureEnvironment.AzureGlobalCloud);

var azure = Azure.Configure()
.WithLogLevel(HttpLoggingDelegatingHandler.Level.Basic)
.Authenticate(credential)
.WithSubscription(subscriptionId);

var cosmosDbAccounts = azure.CosmosDBAccounts;
var readWritekeys = cosmosDbAccounts.ListKeysAsync(resourceGroupName, databaseAccountName)
.GetAwaiter()
.GetResult();

Once it has the master key, it starts accessing the Cosmos DB (Step 5).

using Microsoft.Azure.Documents;
using Microsoft.Azure.Documents.Client;

string cosmosDBendpointUri = $"{databaseAccountName}.documents.azure.com:443/";

string masterKey = readWritekeys.PrimaryMasterKey; //// pick the one you need

var connectionPolicy = new ConnectionPolicy { ConnectionMode = ConnectionMode.Direct, ConnectionProtocol = Protocol.Tcp };

var documentClient = new DocumentClient(new Uri(cosmosDBendpointUri), masterKey, connectionPolicy);

client.OpenAsync()
.GetAwaiter()
.GetResult();

You may wonder why the daemon application identity, rather than an Azure MSI representing the FES, is used to retrieve the Azure Cosmos DB keys. The answer is security isolation, JIT access, getting the daemon application secret from Key Vault, and accessing AAD to get it’s token all help support security isolation. This orchestration makes sure that FES does not have access to all the tenants’ keys. It can get access to keys JIT only by using the daemon identity.

This system has the following advantages:

◈ No access key is kept with the publisher, in code, or in any configuration files. This method provides the security needed for every tenant.
◈ One publisher access token cannot access all the tenants.
◈ Each subscribing customer is provisioned with its own daemon application identity for access to that customer’s resources.
◈ Only at the run time can FES get the access token by using the daemon application secrets.

Azure Cosmos DB brings many of its advantages to this solution, such as:

◈ The publisher does not know how much throughput and space is required at the time of onboarding a new tenant.
◈ Azure Cosmos DB’s elastic nature for storage and throughput keeps this solution very flexible.
◈ The Azure Managed Applications template defined by the publisher comes with a minimum default Azure Cosmos DB whose request units can be expanded as needed.
◈ JIT access through the use of daemon applications and Key Vault.

Tuesday, 27 November 2018

Running Cognitive Service containers

We announced a preview of Docker support for Microsoft Azure Cognitive Services with an initial set of containers ranging from Computer Vision and Face, to Text Analytics. Here we will focus on trying things out, firing up a cognitive service container, and seeing what it can do.

Installing Docker


You can run docker in many contexts, and for production environments you will definitely want to look at Azure Kubernetes Service (AKS) or Azure Service Fabric. In subsequent blogs we will dive into doing this in detail, but for now all we want to do is fire up a container on a local dev-box which works great for dev/test scenarios.

You can run Docker desktop on most dev-boxes, just download and follow the instructions. Once installed, make sure that Docker is configured to have at least 4G of RAM (one CPU is sufficient). In Docker for Windows it should look something like this:

Azure Certification, Azure Guides, Azure Study Material, Azure Tutorial and Material

Getting the images


The Text Analytics images are available directly from Docker Hub as follows:

◈ Key phrase extraction extracts key talking points and highlights in text either from English, German, Spanish, or Japanese.
◈ Language detection detects the natural language of text with a total of 120 languages supported.
◈ Sentiment analysis detects the level of positive or negative sentiment for input text using a confidence score across a variety of languages.

For the text and Recognize Text images, you need to sign up for the preview to get access:

◈ Face detection and recognition detects human faces in images as well as identifying attributes including face landmarks (nose, eyes, and more), gender, age, and other machine-predicted facial features. In addition to detection, this feature can check to see if two people in an image or images are the same by using a confidence score. It can compare it against a database to see if a similar-looking or identical face already exists, and it can also organize similar faces into groups using shared visual traits.
◈ Recognize Text detects text in an image using optical character recognition (OCR) and extracts the recognized words into a machine-readable character stream.

Here we are using the language detection image, but the other images work the same way. To download the image, run docker pull:

docker pull mcr.microsoft.com/azure-cognitive-services/language

You can also run docker pull to check for updated images.

Provisioning a Cognitive Service


Now you have the image locally, but in order to run a container you need to get a valid API key and billing endpoints, then pass them as command line arguments. First, go to the Azure portal and open the Cognitive Services blade. If you don’t have a Cognitive Service that matches the container, in this case a Text Analytics service, then select add and create one. It should look something like this:

Azure Certification, Azure Guides, Azure Study Material, Azure Tutorial and Material

Once you have a Cognitive Service then get the endpoint and API key, you’ll need this to fire up the container:

Azure Certification, Azure Guides, Azure Study Material, Azure Tutorial and Material

The endpoint is strictly used for billing only, no customer data ever flows that way.

Running a container


To fire up the container, you use the docker run command to pass the required docker options and image arguments:

docker run --rm -it -p 5000:5000 mcr.microsoft.com/azure-cognitive-services/language eula=accept apikey=<apikey> billing=<endpoint>

The values for the API key and billing arguments come directly from the Azure portal as seen above. There are lots of Docker options that you can use, so we encourage you to check out the documentation.

If you need to configure an HTTP proxy for making outbound requests then you can do that using these two arguments:

◈ HTTP_PROXY – the proxy to use, e.g. http://proxy:8888
◈ HTTP_PROXY_CREDS – any credentials needed to authenticate against the proxy, e.g. username:password.

When running you should see something like this:

Azure Certification, Azure Guides, Azure Study Material, Azure Tutorial and Material

Trying it out


In the console window you can see that the container is listening on http://localhost:5000 so let’s open your favorite browser and point it to that.

Azure Certification, Azure Guides, Azure Study Material, Azure Tutorial and Material

Now, select Service API Description or jump directly to http://localhost:5000/swagger. This will give you a detailed description of the API.

Azure Certification, Azure Guides, Azure Study Material, Azure Tutorial and Material

Select Try it out and then Execute, you can change the input value as you like.

Azure Certification, Azure Guides, Azure Study Material, Azure Tutorial and Material

The result will show up further down on the page and should look something like the following image:

Azure Certification, Azure Guides, Azure Study Material, Azure Tutorial and Material

You are now up and running! You can play around with the swagger UX and try out various scenarios. In our blogs to follow, we will be looking at additional aspects of consuming the API from an application as well as configuring, deploying, and monitoring containers.

Monday, 26 November 2018

Best practices for alerting on metrics with Azure Database for MySQL monitoring

Whether you are a developer, database administrator, site reliability engineer, or a DevOps professional, monitoring databases is an important part of maintaining the reliability, availability, and performance of your MySQL server. There are various metrics available for you in Microsoft Azure Database for MySQL to get insights on the behavior of the server. You can also set alerts on these metrics using the Azure portal or Azure CLI.

Azure Study Materials, Azure Guides, Azure Certification, Azure Tutorial and Material

With modern applications evolving from a traditional on-premises approach to becoming more hybrid or cloud-native, there is also a need to adopt some best practices for a successful monitoring strategy on a hybrid and public cloud. Here are some example best practices on how you can use monitoring data on your MySQL server, and areas you can consider improving based on these various metrics.

Active connections


Sample threshold (percentage or value): 80 percent of total connection limit for greater than or equal to 30 minutes, checked every five minutes.

Things to check:

◈ If you notice that active connections are at 80 percent of the total limit for the past half hour, verify if this is expected based on the workload.
◈ If you think the load is expected, active connections limit can be increased by upgrading the pricing tier or vCores. You can check active connection limits for each SKU.

Azure Study Materials, Azure Guides, Azure Certification, Azure Tutorial and Material

Failed connections


Sample threshold (percentage or value): 10 failed connections in the last 30 minutes, checked every five minutes.

Things to check:

◈ If you see connection request failures over the last half hour, verify if this is expected by checking the logs for failure reasons.


◈ If this is a user error, take the appropriate action. For example, if there is an authentication failed error, check your username/password.

◈ If the error is SSL related, check the SSL settings and input parameters are properly configured.
     ◈  Example: mysql "sslmode=verify-ca sslrootcert=root.crt host=mydemoserver.postgre.database.azure.com dbname=postgres user=mylogin@mydemoserver"

CPU percent or memory percent


Sample threshold (percentage or value): 100 percent for five minutes or 95 percent for more than two hours.

Things to check:

◈ If you have hit 100 percent CPU or memory usage, check your application telemetry or logs to understand the impact of the errors.
◈ Review the number of active connections. Check for connection limits. If your application has exceeded the maximum connections or is reaching the limits, then consider scaling up computing.

IO percent


Sample threshold (percentage or value): 90 percent usage for greater than or equal to 60 minutes.

Things to check:

◈ If you see that IOPS is at 90 percent for one hour or more, verify if this is expected based on the application workload.
◈ If you expect a high load, then increase the IOPS limit by increasing storage. Storage to IOPS mapping is below for reference.

Storage


The storage you provision is the amount of storage capacity available to your Azure Database for MySQL server. The storage is used for the database files, temporary files, transaction logs, and the MySQL server logs. The total amount of storage you provision also defines the I/O capacity available to your server.

Basic General purpose  Memory optimized 
Storage type Azure Standard Storage  Azure Premium Storage  Azure Premium Storage 
Storage size  5GB TO 1TB  5GB to 4TB  5GB to 4TB 
Storage increment size  1GB  1GB  1GB
IOPS  Variable  3IOPS/GB
Min 100 IOPS
Max 6000 IOPS 
3IOPS/GB
Min 100 IOPS
Max 6000 IOPS

You can add additional storage capacity during and after the creation of the server. The Basic tier does not provide an IOPS guarantee. In the General purpose and Memory optimized pricing tiers, the IOPS scale with the provisioned storage size in a three to one ratio.

Storage percent


Sample threshold (percentage or value): 80 percent

Things to check:

◈ If your server is reaching provisioned storage limits, it will soon be out of space and set to read-only.
◈ Please monitor your usage and you can also provision for more storage to continue using the server without deleting any files, logs, and more.